Book Online with GitBook
Aug 6, 2018
Publish Your Book Online with GitBook

This article provides instruction on using tools and a process that will help create and share content online. Some of these tools are used by Web Developers and the instructions will be familiar. I have provided links and instructions for less experienced readers and hope that these tools can be learned along with learning how to produce a book online.
Teaching Online
As an online Web Development instructor, I look for ways to share content online. There are a lot of tools in the online instructor’s toolbox that help with sharing content. Canvas is where assignments are shared and grades are maintained. Slack (and other similar chat applications) are really helpful for sharing code and links with students through a direct channel or with the class through a course channel.
The First Problem
Sometimes I find myself answering the same question in multiple channels and at that point I post the answer to the course channel. But I know that I will probably have this question come up again in the next term and my problem is therefore: what is the best way to post content online that will be available for students from past courses as a reference, current courses as a resource and future courses as the question comes up again? And if the answer changes, because rules of Web development are always changing, I need to be able to change my answers over time.
The Solution
I found the solution using Gitbook. Gitbook is a static site generator that provides a way to write books and share them online. Static site generators are applications that build HTML web pages from static content in the form of raw data, such markdown, and predefined templates and themes. The HTML pages can then be hosted on a simple HTTP server.
Static site generators are an alternative to using Content Management Systems. This article from 2015 indicates that even back then they were becoming a popular alternative to content management systems: An Introduction to Static Site Generators. You can find debates online as to which is the best.
GitBook allows for integration with GitHub and this means that you can get a backup with version control for all the content you create.
In addition GitBook supports plugins and supplies a plugin theme for creating FAQ’s. The GitBook plugin theme displays the FAQ as a searchable list of articles. You can find documentation on the GitBook toolchain here: https://toolchain.gitbook.com/config.html. Most of this article will report on using the GitBook toolchain to produce a book.
GitBook is Evolving
Did I mention that the rules of Web development are always changing? That includes GitBook. About six months ago I created an FAQ website with GitBook and I was really pleased with it. All of the work was done online and the FAQ was hosted on GitBook’s servers. I could share links to answers to recurring questions from students. If a new question arose, I could document the answer and if the answer changed due to changing rules, I could easily update and publish the change on GitBook.
The picture below is GitBook’s FAQ and it looks like the FAQ page I created with different content. Each article title is a question and each article answer is a content page that can contain text, pictures and code snippets.GitBook’s own FAQ

GitBook Version 2 was released a few months ago and if you navigate to ‘gitbook.com’ you’ll be working in Version 2, which is not a static site generator. You can still access Version 1 by navigating to ‘legacy.gitbook.com’. Because Version 2 is not a static site generator, it can’t be hosted elsewhere.
The legacy GitBook defined an editor, a command line interface, and a toolchain for creating and publishing content. The product of these tools was a set of markdown and HTML that could be served anywhere. I like that flexibility because I like to take advantage of GitHub.io and configure my GitHub.com repo to be served from GitHub.io.
The Second Problem
The change in GitBook.com gave rise to my second problem which was: how can I easily create versioned markdown, translate to HTML and serve anywhere using tools I’m already familiar with?
The Second Solution
Using the tools provided by GitHub (github.com), legacy GitBook (legacy.gitbook.com), a script runner (node.js), and an automation toolkit (gulp.js), I created a process for authoring, building, publishing and hosting my student FAQ.
To make the process of creating a new book easily repeatable, I encapsulate the work in a gitbhub.com repository which serves as a template for future content projects. The README.md on this template repository (named gitbook-publishable-template) provides instructions for duplicating the repo without forking it as that is the starting point inproducing a new book or FAQ.
The rest of this article provides instructions for setting up this authoring/publishing environment. The environment is a mixture of manual and automated processes which rely on node.js and npm for automation. The process of typing up the content uses a locally installed GitBook editor. Markdown and HTML are maintained in a repository on github.com and served via using GitHub Pages. I’m using Visual Studio Code as an interactive development environment but this choice is optional, and an IDE is not really necessary, but it helps me organize the work. As of this writing, all of these components are provided by their maintainers as open source code or free of charge.
Creating an Environment For Building the Book
A Tool with which to Write a Book

Building the environment begins with installing code that is downloaded from the Internet. I am an Administrator (member of the Administrator group) on my local computer whether it is a Mac or Windows OS. If I run into permission errors during installation I override with my Admin credentials. This might mean using “Run as Administrator” on Windows or “sudo” if you’re using the Mac OS or Linux bash interface, or Git Bash on Windows. When executing commands, I like to use the bash command line interface (CLI), so I use Terminal or iTerm2 on the Mac, Git Bash on Windows, and whatever shell that is installed on my Linux platform..
Download and Install this Code:
Git
If you navigate to https://git-scm.com/downloads you can choose which version of Git to install and it will download and install install per your platform. Once it’s install you can check that it’s properly installed by opening a new CLI window and verifying that a version exists.
If you’ve installed Git on Windows you should be able to run “Git Bash” and then execute these commands.
Git and GitHub.com are not the same. Git is a local program that allows you to execute commands to enable file versioning. You can also configure your local Git repository to link up to a repository on GitHub.com. GitHub.com is a web application that helps store, manage and visualize your repositories online. There is excellent documentation for all facets of working with GitHub.com on the website.
GitBook Editor
Navigate to https://legacy.gitbook.com/editor and choose the download that matches your platform. GitBook Editor is gui application. From Windows you can click on the “Windows Key” and type in “GitBook Editor” and if installed properly the application will be found. From the Mac you can use Spotlight (Cmd-Space) to find the application and run it.
Instructions for using the local GitBook Editor application within the context of this article are provided in the next section on “Process of Creating a Book”.
Node/Npm
Navigate to https://nodejs.org/en/download/ and choose the platform you’re using from the table of downloads. If you’re not sure, you probably want to install the 64-bit version of the code. node and npm are two separate programs that are installed by this download. node.js is a JavaScript script runner and npm is a package manager that helps you get and install node.js (JavaScript) packages.
Once you’ve downloaded and installed the code, you can verify that node and npm are installed by executing the commands below.
Once npm is installed you can use it to install some code that will be used for the automation of the build process. npm can be used to install code globally or locally depending on how it will be used in a project. At this point you’ll install two packages globally. The packages are gulp and and gitbook-cli. gulp provides a way to sequence commands that execute steps in the local Operating System. gitbook-cli is part of the legacy gitbook toolchain and provides the gitbook commands which will be executed to build HTML out of Markdown. Execute the commands below to install gulp and gitbook-cli globally. If you have permissions errors, make sure you’re an Administrator or a member of an Administrator group and run the command prefaced with “sudo” if necessary. I also show verification of the install by testing the version of gulp and gitbook
Visual Studio Code
Installing Visual Studio Code is optional and the process described for building and publishing your book does not require the use of an IDE, but I suggest using it as will will help organize your work.
Navigate to the Visual Studio Code setup page where you will find instructions for installing the application on your platform.
VS Code allows access to the command line from inside the application. Using the menu “View : Integrated Terminal” or the CTRL-` (control-backtick) key combination opens up a terminal in which the working directory is the directory opened using the menu “Open : Folder” (CTRL-K-O key combination)on Windows or “File : Open” (CMD-O) on Mac.
If you are using Windows and have installed Git, it is useful to make Git-Bash the default CLI when you open the VS Code integrated terminal. Make this a User Setting by choosing “File : Preferences : Settings” from the menu. This opens an editable section on the right. Add the following key : value data to make Git Bash the default CLI. Save the change.
The User Settings is maintained as a JSON formatted file. The image below shows my complete User Settings so that the setting for Windows shell can be seen in context. Mac users will get a bash interface by default.![]()
 Visual Studio Code User Settings
With all of the supporting global code and applications in place, we can now begin the process of creating a book.
Process of Creating a Book
Publishing a Book
Create a github.com Repository
The book will be saved and hosted by GitHub.com, so to start the process sign-up for an account on GitHub.com if you don’t have one and then create a new repository on Gitbhub.com by clicking on the “+” in the upper-right corner of any page and then click New repository. Your form should be filled out as shown on the image below. You can name and describe the book repo as you wish. It should be marked as public and should not include a README.md. The .gitignore and license should be none.Creating a new repository for your book on Github.com

2. Mirror the Template Repository
I have created a publishing template repository that contains instructions in the README.md for duplicating itself into the new repository created above that exists in your account. Normally repos are “copied” by “forking” them, but these instructions will create a duplicate of the template repository without any versioning history or connection to the original template.
For the instructions below, you will change the <account name> to your GitHub account name and <new repo name> to the name you assigned when creating a new repo in the instructions above. For example my account name is rebeccapeltz and and repository name is my-book.
On your command line go to your home directory and create a directory under it called “projects”. I like to create a projects directory to hold my work, but the name is arbitrary and you can name it whatever your choose. Navigate into the projects directory using the cd command. Then issue the “bare” option of the clone command to create a local copy of the files in the template repo.
Next navigate into the directory created by the “bare clone” command and push the code to your new repository. Finally navigate back out of the directory using the cd .. command and remove the template directory.
In my case I pushed by code using the following
I can now navigate online to https://github.com/rebeccapeltz/my-book and see the files copied over from the template in my own repository.
Clone the New Repository to Your Local Projects Directory
Now that I have a github.com repository to hold my book data, I’ll clone it to my local computer hard drive so that I can work on it locally. The commands to do this are as follows and you would replace <account name> and <new repo name> with your own.
In my case the command command to clone my new repository would be
3. Open Your Local Repository Using Visual Studio Code
If you have installed Visual Studio Code you can open the directory my-book using the commands from the VS Code menu and then navigate to, and choose the folder that matches your new repository name.
You should see the file that you duplicated from the template. You can open a terminal window with CTRL+` and you’re ready to work on building the book.
GitHub makes it easy to get the URL to the directory you want to clone. If you click on the Green “Clone or Download” button and then make sure it says Clone with HTTPS you can copy the URL into your clipboard.

4. Install Local npm Packages
The package.json file contains instructions for installing local code used in building the book. There are entries in the file that you should change to make your own. The file is stored in JSON format which means data is of the form “key : value”. You should change the values of the file to match your specific project. The keys that you should focus on are:
name : the name of your repository cannot contain spaces
description: the description of your repository
author: your name
license: optional, you can look at license options to change
repository url: the url you used to clone the repository
bugs url: the url you used to clone the repository
homepage url: the url you used to clone the repository
Using the integrated terminal enter the following command to install local npm packages.
5. Create a Book or an FAQ?
I created the template with the idea of building FAQ’s, but there is an each change you can make if you want to build a book instead. Open the book.json file and delete the line that says “theme-faq”.Plug with them for

The difference between creating a book and an FAQ is thematic. In a book you have Chapters and Pages while in an FAQ you have Questions and Answers.
After deleting and saving the FAQ theme, book.json looks like this.No plugins

There a hundreds of GitBook plugins, so you can try them out by adding them to book.json. You can also add plugins at any time during the life of the book you are working on and you’ll see an example of doing that later on.
If you do have plugins listed in book.json, they need to be installed by executing a GitBook CLI command. You installed GitBook CLI globally with npm in an earlier step.
It doesn’t hurt to run install even if you have no plugins. Nothing happens and you get a message to that effect.
6. Build the Book
At this point, even though I have provided none of my own content, I can build the book and publish it on GitHub.com to be served on GitHub Pages.
The build process converts and content I have to HTML and writes it into a docs directory in the local repo. Run the following command to make this happen.
The results of running the gulp command indicate a sucessful build and copy to the docs directory.Success

7. Push the Book to github.com
You can check the status of your changes by using the git status command.modifications and additions to the repo directory

You can now add and commit the changes. There are two commands for this and then you’ll see each and every file that was changed. The git add -A command add all of the files to the git staging area and the git commit -m command commits the file to the local repository. You must supply a message after the -m option to describe the change. In the example below, I use the message “First build”. Usually the message will detail the changes you’re committing to git.
Now you’re ready to push the local repo up to GitHub.com using the git push command.
If this is successful you’ll see output similar to what is shown in the image below.Successful push to github

If you run into problems, see the GitHub.com troubleshooting page.
8. Publish to github.io
GitHub will host your HTML on its own servers if you have HTML in your directories. You configure your book to be served from the docs directory. That is because the gulp build process put the HTML output into the docs directory.
Return to your browser and navigate to github.com. Find the repo you created and click on the Settings Tab to go to an area where you can configure your docs directory to be served.Settings Tab

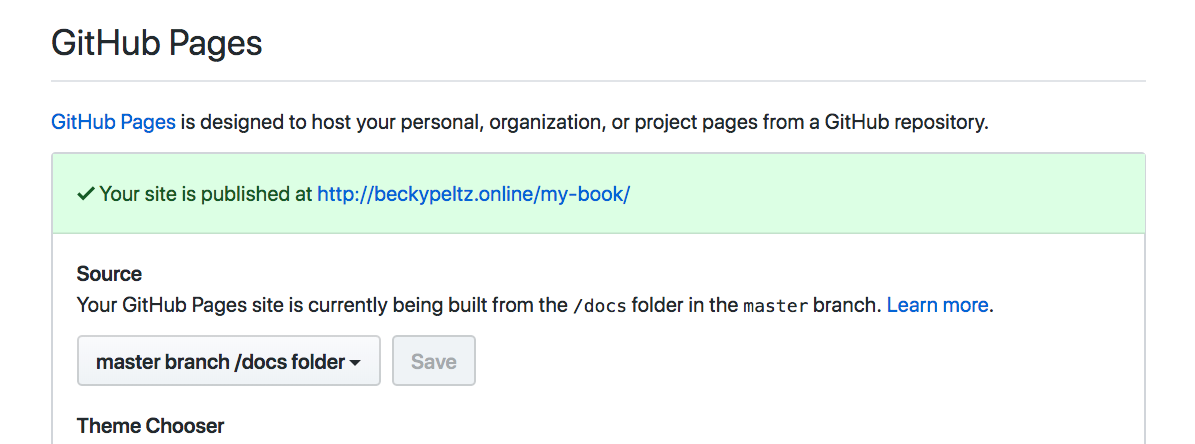
Scroll down until you see GitHub Pages

From the Source dropdown, select “master branch/docs folder” and press save. You’ll be scrolled back up to the top of the page.

Scroll back down to the GitHub pages area and you’ll see that GitHub is publishing your site. When it’s done the color will change to green and you can click on the link to see what you published. As long as the blue background exists the site is still queued for publishing. It can take several minutes.Awaiting publicationSuccessfully published

You can see that you have published content from the template. The image below shows what is initially rendered from the template that’s been copied to your account.

It’s time to add your own content to the book!
9. Use Gitbook Editor to add Your Own Content
Open the “GitBook Editor” that you installed earlier. Once the editor application is running select “GitBook Editor” and choose “Open…” and then navigate to the directory on your local drive containing the repository code.

You’ll see the content ready to be edited. The title will be empty and there’s not need to change that.Ready to Edit

Before you begin editing, it’s a good idea to “pull” and “sync” so that you’re starting with the latest content from GitHub. I always “pull” and “sync” when I return to the Gitbook Editor in case I’ve changed files outside of the editor or from an editor on another computer.
You’ll notice that the README.md file from the template provides the content for the Introductory page of the book. You can delete all of this and provide your own introduction which is how the page is labeled on the left navigation. The SUMMARY.md file provides the table of contents for the book.
You can then use the button to “Add New Article” to create new markdown pages that contain the contents of each chapter of your book.

As you work on the contents of the book, use the save button to save your work. It’s a good idea not to wait until the end of the book to save because if something goes wrong on your local computer, you could lose it. The save button will be disabled when there are no changes to save.Save button is disabled

The save button will be enabled when there are changes to save.Save button is enabled

Your book is hooked up to both your local git repository and your GitHub repository. Your local repository will be updated as you modify and save the contents in the editor. You should use the Git Book editor menu’s “Book : Push” to push your changes to GitHub.com. This should be done frequently as well. Git is a version control tool so it’s possible to roll back to a previous version and you can find documentation on git commands if you need to this.Push to save changes to Github.com

When you’ve finished a writing session, save and push your contents. You’ll then return your the gitbook command line to build and publish.
10. Add Images to the Book
While in the GitBook Editor, you can add images to the book by clicking on the image icon. You can select images from several sources.![]() Click on Image icon to add an imageChoose an existing image or a new image
Click on Image icon to add an imageChoose an existing image or a new image


After adding an image to the book, you’ll see the image file in an assets directory in the book’s repository directory.
11. Add Math to the Book
You can add math symbols and equations to the book by adding a plugin to the book. There are two plugs that work with enable Math: Katex and Mathjax. I’ve added a math equations to my sample book using Katex. First add “katex” to the list of plugins in book.json.katex is a plug that enables publishing Math symbols

To install the plugin use the GitBook CLI.
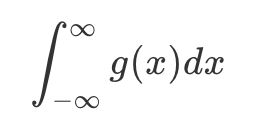
Then, using the template language paste the language needed to create the equation you want to publish. For example the integral from minus infinity to plus infinity of a function.
Katex rendersMath rendered by Katex plugin
12. Repeat the Process to Publish the latest Content
At this point you will execute steps 6 and 7 above: build the book and push to GitHub. Building the book will delete the old files from the docs directory and replace them with new files based on changed markdown. Pushing to Github will make the content available on the web. In the sample command below, you’ll want to compose your own description of the changes made. This description is visible on GitHub.com and can be useful if you want to pick up a different version or rollback changes.
GitBook published book

From here on out the process of writing the book will consist of editing with the GitBook editor and building and pushing the HTML to GitHub.com.
Turn the Book into an FAQ
The edited book can be turned into an FAQ by adding the FAQ theme to the list of plugins and then installing and gulping.

The book now is in FAQ format.

Share your Book or FAQ
You’re ready to share your book or FAQ web site now! Here is an example of an FAQ I share with students in the Web Application Technology Certificate program in which I teach: https://suwebdev.github.io/wats-lab-faq/
What is a presented here is a bare bones process for producing an online book or FAQ. There is room for improvement and even more automation.
For anyone interested in the how static site generators work, this bare bones process may be helpful in better understanding them. If you choose to create a book or FAQ with these tools, I recommend practicing the process with dummy content with the idea that you can just delete the local and GitHub repos. You will want to gain some confidence and understanding of the tools and process before you commit and possibly corrupt your own valued content.
Reference : https://medium.com/@rebeccapeltz/publish-your-book-online-with-gitbook-fc0ce9b7f12
Last updated