# Binance Python API
## Binance Python API – A Step-by-Step Guide
### Table of Contents
1. [What is the Binance API?](https://algotrading101.com/learn/binance-python-api-guide/#what-is-the-binance-api)
2. [Why should I use the Binance API?](https://algotrading101.com/learn/binance-python-api-guide/#why-should-i-use-the-binance-api)
3. [Why shouldn’t I use the Binance API?](https://algotrading101.com/learn/binance-python-api-guide/#why-should-i-not-use-the-binance-api)
4. [What are the alternatives to using the Binance API?](https://algotrading101.com/learn/binance-python-api-guide/#what-are-alternatives-to-binance-api)
5. [Are there any Python libraries available for the Binance API?](https://algotrading101.com/learn/binance-python-api-guide/#are-there-python-libraries-binance-api)
6. [How do I get started with the Binance API?](https://algotrading101.com/learn/binance-python-api-guide/#how-do-start-with-binance-api)
7. [Does Binance offer a demo account?](https://algotrading101.com/learn/binance-python-api-guide/#does-binance-offer-a-demo-account)
8. [How do I retrieve my account balance using the Binance API?](https://algotrading101.com/learn/binance-python-api-guide/#how-do-i-retrieve-account-balance)
9. [How can I retrieve the latest price for Bitcoin?](https://algotrading101.com/learn/binance-python-api-guide/#how-do-i-get-latest-bitcoin-price)
10. [How can I get Bitcoin’s historical price data in CSV format?](https://algotrading101.com/learn/binance-python-api-guide/#how-do-i-get-bitcoin-historical-csv-data)
11. [Should I trade futures or spot? What is the difference?](https://algotrading101.com/learn/binance-python-api-guide/#should-i-trade-spot-or-futures)
12. [How to access technical indicators such as the 20 SMA](https://algotrading101.com/learn/binance-python-api-guide/#technical-indicators-binance-api)
13. [How to fire an order for Ethereum using the Binance API](https://algotrading101.com/learn/binance-python-api-guide/#fire-an-ethereum-order-binance-api)
14. [How to implement a stop loss or take profit using the Binance API](https://algotrading101.com/learn/binance-python-api-guide/#implement-stop-loss-binance-api)
15. [How to use Binance Coin (BNB) for discounted trading commissions](https://algotrading101.com/learn/binance-python-api-guide/#use-bnb-for-discount-trading-fees)
16. [How to execute a trade on ETH when BTC hits a certain price](https://algotrading101.com/learn/binance-python-api-guide/#execute-eth-trade-on-bitcoin-price)
17. [How to execute an ETH trade when BTC moves 5% in the last 5 minutes](https://algotrading101.com/learn/binance-python-api-guide/#execute-eth-trade-on-btc-price-movement)
18. [Final Thoughts](https://algotrading101.com/learn/binance-python-api-guide/#final-thoughts)
### What is the Binance API?
The Binance API is a method that allows you to connect to the Binance servers via Python or several other programming languages. With it, you can automate your trading.
More specifically, Binance has a RESTful API that uses HTTP requests to send and receive data. Further, there is also a WebSocket available that enables the streaming of data such as price quotes and account updates.
### Why should I use the Binance API?
Binance has established itself as a market leader when it comes to cryptocurrency trading. It currently ranks number one for Bitcoin volume according to coinmarketcap.com and ranks well for many other currencies.
Commissions are very competitive and you may be hard-pressed to find another exchange with lower fees.
Lastly, Binance has a good track record of security. There have only been a few instances of Binance getting hacked which is something that all exchanges are susceptible to due to the nature of the business.
The most important part, when Binance got hacked in 2019, and more than $40 million was stolen, Binance covered the users that were impacted.
### Why shouldn’t I use the Binance API?
While security is a big plus point for Binance when it comes to exchanges, there are better alternatives, depending on your needs.
If your primary interest is trading Bitcoin, you might be better off trading Bitcoin futures with a regulated broker like Interactive Brokers for example.
The benefit of a regulated broker is that they have insurance schemes in place to protect the consumer.
If trading futures is not your thing, there are several regulated brokers that offer CFD trading on cryptocurrencies which can be a good alternative.
It should be noted that these options don’t have nearly as extensive of an offering as Binance. And in most cases, the trading fees are significantly higher.
Another negative of Binance is in its API itself.
API architects always plan carefully as its not good practice to make API changes, they tend to impact many users and it’s not always easy communicating changes.
Within the short time span of three years, Binance is already on version 3 of its API. While it’s great that they are implementing new features, users need to stay on top of ongoing changes.
There are also outages. In recent times, Binance has taken its API offline roughly once a month for a few hours each time for planned updates. This requires manual intervention and additional position management for algo traders.
Lastly, they don’t have an inhouse library available, although there are third-party solutions. We will discuss this point in more detail later in the guide.
### What are the alternatives to using the Binance API?
Coinmarketcap has more than 300 exchanges listed in its database, and many of them offer an API. So there isn’t a shortage of alternatives.
Some of the names that stand out from their list as well-established exchanges include Coinbase, Kraken, Bitfinex, Bitstamp, and Bittrex.
Futures traders may also want to take a look at Bitmex which is a popular exchange with competitive commissions. They even pay you for certain order types rather than charging a trading fee.
### Are there any Python libraries available for the Binance API?
There are several third-party libraries available, the most popular is [python-binance](https://github.com/sammchardy/python-binance).
There is an interesting story on how this library came to be the most popular Python library for Binance.
When Binance launched in 2017, they held a contest to see who can come up with the best library for various different programming languages. The winners were each rewarded 1000 Binance coins (BNB).
There were several good submissions for the Python category but python-binance ultimately won.
This was a clever approach to ensure the best developers worked hard to create a good library.
However, perhaps it would be more advantageous to the user to have an inhouse library, maintained by staff, rather than leaving the onus of maintenance to the author of python-binance.
Another popular library is [CCXT](https://github.com/ccxt/ccxt). This library supports over a hundred different exchanges and is available in many different programming languages.
This is a good option for those planning to do arbitrage or trade on several exchanges simultaneously.
### How do I get started with the Binance API?
#### Sign up with Binance

The first step is to create an account with Binance. You only need to enter your email and create a password –
Optionally, if you’re interested in using a Referral ID, you can use ZCYOCDMQ to receive a 10% discount off your trading fees.
That’s my Referral ID, thanks for supporting me! – Jignesh
You will be asked if you want to enable two-factor authentication for additional security. We highly recommend that you do. If you’ve never used it before, you will need to [install Google Authenticator](https://support.google.com/accounts/answer/1066447).
There are tutorials on getting started on things like your first deposit and much more on [Binance Academy](https://academy.binance.com/tutorials).
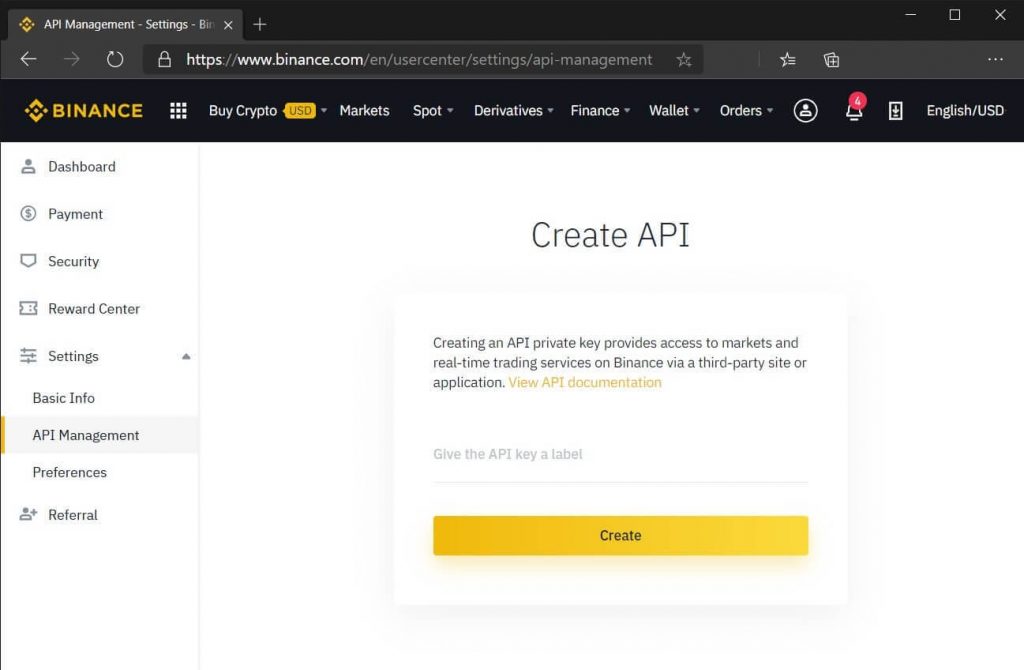
#### Obtaining an API key
After logging in to your Binance account, click on the profile icon on the top right-hand side of the screen. From there, select API Management.
Next, you will be asked to create a label for the API key. If you plan to create multiple keys, it’s a good idea to use a descriptive name here so that you can easily distinguish it later on.
If you have two-factor authentication enabled, you will be asked to authenticate once again at this point.
Binance will send you an email to confirm the API key creation. Click on the confirmation link from your confirmation email to proceed.
Your API key should be created at this point. Note that this is the only time your API secret will be revealed. If you navigate away from this screen, you will not be able to see it again.
In such a scenario, you will need to delete your API key and start over again by creating a new one.
Guard your API details as you would with any password as anyone can get access to your account if they were able to get a hold of this information.
Before moving forward, there are a few settings here that we need to take a look at.
The **Read Only** option is selected by default, and you likely won’t be able to uncheck it.
This permits the API to read your account details and is enabled by default. Perhaps it is a bit misleading since it includes the term **Only**, but you can still perform other operations with this option checked.
There is also an option to **Enable Trading**, **Enable Withdrawals**, and **Enable Future**.
If you’re still testing out the API, it might be a good idea to leave these unchecked. If you’re ready to start trading, then check off the Enable Trading box and the Enable Future box if you plan to trade futures.
For some people, the Enable Future box won’t be shown here. That means the account is not set up for trading futures.
It is easy to setup Futures trading on your account if it is not already enabled. From the main Binance login page, click on the **Derivatives** option in the top menu bar.
From there, click on Futures which should take you to the Futures trading screen. There should be an option on that page to open a Futures account.
If you plan to make withdrawals from within your Python trading script, you will need to enable it. To do so, you have to specify the IP address from where the script will be accessing the API. This is for security purposes.
If you intend on running your script from a virtual private server such as AWS, this shouldn’t be a big problem. However, if you are running the script from your local machine, you could run into issues as most internet service providers do not offer static IP addresses.
There are third-party solutions, such as noip.com that provide a way around not having a static IP.
#### Installing the python-binance library
The easiest way to install the python-binance library is to use pip. From the command line, simply type:
```
pip install python-binance
```
#### Securing your API keys
We recommend storing your API keys as environment variables. That way, if you upload your code to GitHub, or send it to someone, you don’t run at the risk of revealing your credentials.
This can be done via the command prompt. Here is the syntax for Windows users.
```python
set binance_api=your_api_key_here
set binance_secret=your_api_secret_here
```
You can verify that the keys are saved right from the command prompt by launching Python. Here is an example:
And this is how you can store environment variables on a Mac or in a Linux environment using the terminal.
Syntax:
```python
export binance_api="your_api_key_here"
export binance_secret="your_api_secret_here"
```
Example:
We can later retrieve these values from within our Python trading script by using the os library.
### Does Binance offer a demo account?
Before jumping into live trading with the Binance API, there is an option to test out your Python trading script on the Binance API testnet.
Start by going to the Binance Spot Test Network website, you can find it here – 
From there, you will have to create an account, even if you already have an account with Binance.com. We only saw an option to log on with a GitHub account.
Once you’re logged on, you will have to create new API keys. These will be separate from the keys created in the previous step and will be used only to access your demo account.
Choose the option to generate a HMAC key. In the next step, enter in descriptive name for your key.
After clicking generate, you will be taken to a screen that displays your key. If you leave this screen, you won’t be able to access they secret key again, and will have to start over.
Once you’re setup with the keys, all of the endpoints in the live API will be the same as in the Testnet API. The only difference is that you have to use a different URL to access Testnet.
At the time of writing, the python-binance library, which we’ve used in all the examples, does not support the Test Network. However, we will discuss a workaround in the next step.
Please note, Test Network accounts get deleted typically at the start of each month. Any open trades will be wiped out. More details about the Spot Test Network can be found on the same page where you go to create your key.
### How do I retrieve my account balance using the Binance API?
Now that we’ve installed the library and obtained API keys, it’s time to test out a connection to the API. We will start up a client and check out four functions that detail different account balances.
```python
import os
from binance.client import Client
```
We start with our imports. We will need the **Client** class from the python-binance library as well as the **os** library to retrieve the API keys that we stored as environment variables.
```python
# init
api_key = os.environ.get('binance_api')
api_secret = os.environ.get('binance_secret')
```
Next, we store our API key and secret to local variables.
```python
client = Client(api_key, api_secret)
```
And finally, we initialize our client and pass through the API key and secret. We are all set to start accessing the API at t his point.
Unfortunately, the python-binance library does not have support for the demo environment previously discussed. However, we were able to connect by manually changing the API endpoint URL in the library like this:
```
client.API_URL = https://testnet.binance.vision/api
```
If you decide to start with the demo API, make sure you are passing through your Test Network API credentials when initializing the Client and not the live API keys.
```
# get balances for all assets & some account information
print(client.get_account())
```
The above code will print out all of our account details for every currency available on the platform. It will also provide some other info such as the current commission rate and if your account is enabled for margin trading.
This might be a bit too much information. If we are only interested in our **BTC** balance, we can use another endpoint.
```
# get balance for a specific asset only (BTC)
print(client.get_asset_balance(asset='BTC'))
```
If you’re after the balance details of another asset, simply switch out **BTC** with the asset you are after.
```
# get balances for futures account
print(client.futures_account_balance())
```
Account balances for futures accounts are separate from the main balance and therefore require a different endpoint.
Similarly, margin account details are separated as well. Here is how you can access your margin account. Note that an exception will be raised if you have not activated a margin account.
```
# get balances for margin account
print(client.get_margin_account())
```
If you’re not familiar with margin trading, you can check out the Binance guide: [What is Margin Trading](https://academy.binance.com/economics/what-is-margin-trading) for more details and the [Binance Margin Trading Guide](https://academy.binance.com/tutorials/binance-margin-trading-guide) for setup instructions.
### How can I retrieve the latest price for Bitcoin?
There are several methods to get the latest price for Bitcoin. The simplest one involves using the `get_symbol_ticker` function.
You can pass through any ticker here as opposed to **BTCUSDT** if you’re after another asset.
```
# get latest price from Binance API
btc_price = client.get_symbol_ticker(symbol="BTCUSDT")
# print full output (dictionary)
print(btc_price)
```
The code above will print out a dictionary file that contains the symbol and the price. Here is an example output –
```
{'symbol': 'BTCUSDT', 'price': '9678.08000000'}
```
We can access just the price as follows.
```
print(btc_price["price"])
```
In a live Python trading script, we would likely need up to date price information for the asset that we are trading. Fortunately, there is a better solution than constantly making requests to the API. It involves using Binance WebSocket.
#### Using the Binance WebSocket for the latest Bitcoin price
The Binance WebSocket requires us to only send a command once to open up a stream, and then data will automatically stream over as prices get updated.
```
import os
from binance.client import Client
from binance.websockets import BinanceSocketManager
from twisted.internet import reactor
```
We need to import the BinanceSocketManager to use this function, along with our usual imports.
We’ve also imported `reactor` from `twisted`. Twisted is the framework used in the library to access the WebSocket. We will be using `reactor` to terminate the socket when the script is done.
```
# init
api_key = os.environ.get('binance_api')
api_secret = os.environ.get('binance_secret')
client = Client(api_key, api_secret)
btc_price = {'error':False}
```
Next we grab our API details from the environment and start the client, similar to the prior example. A dictionary has also been declared, this will hold our latest price data.
```
def btc_trade_history(msg):
''' define how to process incoming WebSocket messages '''
if msg['e'] != 'error':
print(msg['c'])
btc_price['last'] = msg['c']
btc_price['bid'] = msg['b']
btc_price['last'] = msg['a']
else:
btc_price['error'] = True
```
Then, we will create a function that will tell the socket manager what to do when it receives new data.
For now, we will just print the last closing price to the screen.
We are storing a few items to the dictionary file that we created earlier. This allows us to access the data outside the function.
Aside from the latest price, bid, and ask, we also have error checking built in. This will let us know if there is an error with the Binance WebSocket, in which case we will need to restart it.
A latter example involving the WebSocket expands on the error checking part.
```
# init and start the WebSocket
bsm = BinanceSocketManager(client)
conn_key = bsm.start_symbol_ticker_socket('BTCUSDT', btc_trade_history)
bsm.start()
```
The next step is to initialize the socket manager.
We will call the `start_symbol_ticker_socket` which has similar output to the `get_symbol_ticker` function of the API.
We need to pass through a symbol, which in this case is **BTCUSDT**. We also specify it to call our custom `btc_trade_history` function every time a new message comes in.
Lastly, we just need to start the socket.
If you’re following along, you should see a stream of prices on your screen. It should look similar to the **Trade History** box that is on the Binance webpage under the spot trading section.
In a live Python trading script, you will access the data from the dictionary file outside the function as opposed to printing the data to screen from the function.
When you’re done with the WebSocket, use the following syntax to properly terminate it:
```
# stop websocket
bsm.stop_socket(conn_key)
# properly terminate WebSocket
reactor.stop()
```
The WebSocket can deliver various data. To get a full view of what is available, type the following in your Python terminal.
```
help(BinanceSocketManager)
```
This will list all the different methods available as well as give some information about the returned data.
Here is an example for the start\_symbol\_ticker\_socket:
As you can see it gives a brief description, a link to the official Binance documentation about that function, and some details about the returned data.
This is how we were able to figure out that `msg['b']` returns the best bid. Since `b` is the dictionary key for the best bid value.
### How can I get Bitcoin’s historical price data in CSV format?
We will request historical Bitcoin price data from the Binance API and then outline four options to save that data to a CSV file.
We want data that goes as far back as possible. Fortunately, there is a function within the library that allows us to determine the first available price point.
```
# valid intervals - 1m, 3m, 5m, 15m, 30m, 1h, 2h, 4h, 6h, 8h, 12h, 1d, 3d, 1w, 1M
# get timestamp of earliest date data is available
timestamp = client._get_earliest_valid_timestamp('BTCUSDT', '1d')
print(timestamp)
```
In the code snippet above, we’ve called the `._get_earliest_valid_timestamp` function and passed in **BTCUSDT** as our symbol and **1d** as our timeframe. The output is saved to a variable.
```
# request historical candle (or klines) data
bars = client.get_historical_klines('BTCUSDT', '1d', timestamp, limit=1000)
```
Next, we make the call for historical data. Once again we need to pass through the symbol and variable. Also, a starting date is required and we’ve used our timestamp variable for that.
Lastly, this function by default calls the last 500 points of data. The maximum is 1000 so we’ve increased the limit to the maximum.
In the background, this endpoint will continuously query the API in a loop, collecting 1000 price points at a time, until all data from the start point until today is returned.
In an effort to be ‘kind’ to the API, there is a sleep function built-in after every third call. So this could take a while if you’re looking for say 1-minute data from the very start.
Binance began operations over the summer of 2017, so that will likely be the earliest price point available.
Here is a definition of the data returned as per the Binance API documentation.
Now that we have our date, let’s go through four different options to save it to a file.
```
# option 1 - save to file using json method
with open('btc_bars.json', 'w') as e:
json.dump(bars, e)
```
The first involves using the JSON library. This will maintain the structure of the data which is a list of lists. If you want to keep this structure, this is the way to go. Make sure to `import json`.
```
# option 2 - save as CSV file using the csv writer library
with open('btc_bars.csv', 'w', newline='') as f:
wr = csv.writer(f)
for line in bars:
wr.writerow(line)
```
The second method uses csv writer to save the list as a CSV file. Make sure to `import csv`.
```
# option 3 - save as CSV file without using a library.
with open('btc_bars2.csv', 'w') as d:
for line in bars:
d.write(f'{line[0]}, {line[1]}, {line[2]}, {line[3]}, {line[4]}\n')
```
The third option doesn’t use any library. We’ve created an f string which is a native function of Python 3 and above.
There is a bit more flexibility here. We’ve taken advantage of it and only saved the first five columns: **date**, **open**, **high**, **low**, **close**.
Alternatively, you can also delete the additional columns, if you don’t need them, like this:
```
# delete unwanted data - just keep date, open, high, low, close
for line in bars:
del line[5:]
```
The last option is to utilize the export to CSV function of Pandas. It makes sense to use this option if you plan on holding your data in a DataFrame anyway.
```
# option 4 - create a Pandas DataFrame and export to CSV
btc_df = pd.DataFrame(bars, columns=['date', 'open', 'high', 'low', 'close'])
btc_df.set_index('date', inplace=True)
print(btc_df.head())
```
We’ve passed through our data into a DataFrame and defined the columns. Since we’ve deleted some unwanted columns, there are only five that need to be defined.
This is what our DataFrame looks like at this point –
The date column has been set as an index which makes it a time-series indexed DataFrame. This way, it’s easier to manipulate based on time frames later. It also removes an extra not needed index column when we go to save it as a CSV.
Lastly, we can export the DataFrame as a CSV file.
```
# export DataFrame to csv
btc_df.to_csv('btc_bars3.csv')
```
### Should I trade futures or spot? What is the difference?
In the futures market, you can enter a contract to buy a cryptocurrency at a later date. This means you don’t take actual ownership if you enter in a trade today.
In fact, most futures traders never take ownership. Trading futures is mostly for speculative purposes, even though it was designed for other reasons.
The major advantage of trading futures is that you can short assets that you do not own. This can be useful in arbitrage and hedging strategies.
Another aspect of futures trading is that it is done on margin. This means you only need to put up a portion of the trade value, allowing you to employ leverage. Although with Binance, there is an option to trade spot markets on margin.
Because of various carrying costs, the futures price usually differs from the main markets, or otherwise known as the spot price. However, the prices will usually converge by the expiration date of the futures contract.
With Binance, a big advantage of trading futures is that the trading fees are quite a bit lower compared to spot. So there are quite a few reasons to trade the futures markets.
Here are a few reasons you may not want to trade futures:
* You plan to trade many different crypto’s, possibly against each other – the current futures offering from Binance is currently limited to popular USDT pairs.
* You want to own crypto and maybe store it in an offline wallet.
The Binance API uses a different endpoint for futures trading. But if you’re using the python-binance library, these endpoints are already configured in the library.
Further, the futures functions within the library have been appropriately labeled to distinguish them from the spot markets.
As an example, if you’re trading spot, you would use the following function to access your open orders:
```
client.get_open_orders
```
If you’re trading futures, you would use:
```
client.futures_get_open_orders
```
### How to access technical indicators such as the 20 SMA?
There are several libraries available that ease the process of calculating technical indicators.
We’ve already discussed how you can export a DataFrame as a CSV file. There’s a lot more you can do with Pandas and calculating a moving average is one of them.
Here’s an example:
```
import btalib
import pandas as pd
# load DataFrame
btc_df = pd.read_csv('btc_bars3.csv', index_col=0)
#btc_df.set_index('date', inplace=True)
btc_df.index = pd.to_datetime(btc_df.index, unit='ms')
# calculate 20 moving average using Pandas
btc_df['20sma'] = btc_df.close.rolling(20).mean()
print(btc_df.tail(5))
```
In the above code, we loaded our data from the CSV file we created earlier. Then we use the mean() function to calculate the average on the close column.
The rolling function allows us to set a period for the moving average. This all gets appended to the existing DataFrame. This is what the result looks like.
As you can see, a new column has been created with the 20 moving average.
Let’s say you only need to know where the moving average is as of right now. Or as of the last price point in the DataFrame.
We can use the same mean() function and just run it on the last 20 rows of the DataFrame like this:
```
# calculate just the last value for the 20 moving average
mean = btc_df.close.tail(20).mean()
```
There is a lot more Pandas can do. We can easily grab the highest price Bitcoin traded this year as follows –
```
# get the highest closing price in 2020
max_val = btc_df.close['2020'].max()
```
But Pandas isn’t able to calculate other technical indicators such as RSI, or MACD. The Binance API does not provide this info either.
TA-LIB has been a popular library for some time. We recently got a chance to test out a new library – bta-lib.
This library was created by the author of Backtrader. He discusses on his blog that TA-LIB has several indicators that were improperly implemented.
Further, TA-LIB wasn’t designed for Python. There is a wrapper available but there is much less overhead going with a solution designed for Python.
Bta-lib can be installed using PIP as follows.
```
pip install bta-lib
```
Let’s try calculating the same moving average with the library as a comparison –
```
sma = btalib.sma(btc_df.close)
print(sma.df)
```
We now have a separate DataFrame that contains the values for the moving average. It looks like this:
Note that bta-lib will return an object to our sma variable. To access DataFrame is contained within it, simply type `.df` after the variable name.
By default, the library uses the 30 period moving average.
We can duplicate the same function we had before and calculate the 20 moving average and attach it as a column to our original DataFrame like this.
```
# create sma and attach as column to original df
btc_df['sma'] = btalib.sma(btc_df.close, period=20).df
print(btc_df.tail())
```
Let’s create a few more indicators. Here is how we can calculate the RSI using the bta-lib library –
```
rsi = btalib.rsi(btc_df, period=14)
```
Once again, an object containing a df has been returned. We can access the very last value like this.
```
print(rsi.df.rsi[-1])
```
In a live environment, you might only need the very last value.
Here is how we can calculate the MACD for Bitcoin in bta-lib.
```
macd = btalib.macd(btc_df, pfast=20, pslow=50, psignal=13)
```
Finally, we will join our RSI and MACD values to our original Bitcoin price DataFrame
```
# join the rsi and macd calculations as columns in original df
btc_df = btc_df.join([rsi.df, macd.df])
print(btc_df.tail())
```
And now we have all our calculations easily accessible from one DataFrame – 
### How to fire an order for Ethereum using the Binance API?
The library we are using has a function that allows us to create test orders. Here is an example:
```
buy_order_limit = client.create_test_order(
symbol='ETHUSDT',
side='BUY',
type='LIMIT',
timeInForce='GTC',
quantity=100,
price=200)
```
We can make sure our syntax is correct without having to submit a live order. This is very useful when you are getting to know the API.
If we change the type in the above code to ‘MARKET’ for example, it will throw an exception. The reason being is that a **timeInForce** and **price** parameters are not used for market orders. Instead, a market order would look like this:
```
buy_order = client.create_test_order(symbol='ETHUSDT', side='BUY', type='MARKET', quantity=100)
```
Once your satisfied the syntax is correct, simply swap out the `create_test_order function` for the `create_order function`.
Since there could be an exception, we will wrap our code in a try/except block and also import some of the defined exceptions from the library.
```
import os
from binance.client import Client
from binance.enums import *
from binance.exceptions import BinanceAPIException, BinanceOrderException
# init
api_key = os.environ.get('binance_api')
api_secret = os.environ.get('binance_secret')
client = Client(api_key, api_secret)
```
In addition to the client and the custom exceptions, we have imported binance.enums, which we will discuss shortly.
Here is the order code block.
```
# create a real order if the test orders did not raise an exception
try:
buy_limit = client.create_order(
symbol='ETHUSDT',
side='BUY',
type='LIMIT',
timeInForce='GTC',
quantity=100,
price=200)
except BinanceAPIException as e:
# error handling goes here
print(e)
except BinanceOrderException as e:
# error handling goes here
print(e)
```
An order confirmation will be sent back from the exchange and stored in our buy\_limit variable. This is what it looks like:
It is in a dictionary format. Note that it contains an orderId. We can use this id to cancel the limit order like this –
```
# cancel previous orders
cancel = client.cancel_order(symbol='ETHUSDT', orderId=buy_limit['orderId'])
```
Once again, we receive confirmation. We can print out the cancel variable to view it.
The `create_order` function is the main method to place an order. We can pass through several parameters here.
But there are certain orders which are common, and helper functions have been created for them. They shorten the code required to place an order, making things a bit easier. Here are a few examples:
```
# same order but with helper function
buy_limit = client.order_limit_buy(symbol='ETHUSDT', quantity=100, price=200)
# market order using a helper function
market_order = client.order_market_sell(symbol='ETHUSDT', quantity=100)
```
Here are some of the helper functions you might want to use:
* `order_limit_buy()`
* `order_limit_sell()`
* `order_market_buy()`
* `order_market_sell()`
* `order_oco_buy()`
* `order_ocosell()`
The last two are considered advanced order types. **OCO** stands for **O**ne **C**ancels the **O**ther.
A good example of this is when you’re using a stop loss and a take profit target. If one of these order got hit, you would want the other to get canceled.
Some of the order types require string constants such as ‘**MARKET**‘ or ‘**BUY**‘. Another broker might use ‘**MKT**‘ instead and so there isn’t always a logical answer as to what you should use.
You can look these up in the documentation if needed. Alternatively, the library has hard coded strings into variables that you can use.
This is especially useful if your coding editor has autocomplete as you can quickly figure which parameters to use without having to pull up the documentation.
Here is an example of an order without using the built-in variables:
```
buy_order = client.create_test_order(symbol='ETHUSDT', side='BUY', type='MARKET', quantity=100)
```
And here is the same thing using the built-in variables.
```
buy_order = client.create_test_order(symbol='ETHUSDT', side=SIDE_BUY, type=ORDER_TYPE_MARKET, quantity=100)
```
If you plan to go this route, you will need the enums import discussed earlier.
A full list of all the hard coded strings can be found [here ](https://python-binance.readthedocs.io/en/latest/constants.html#).
### How to implement a stop loss or take profit using the Binance API?
The method to place stop losses or take profits differs with cryptocurrencies compared to other markets such as stocks or Forex.
The reason being, with stocks, you have a base currency. This is often in USD. Once you buy a stock, you are in a ‘trade’. At some point, you will want to sell that stock and return to your base USD currency.
With crypto, there really isn’t a concept of a base currency. When you conduct a trade, you are swapping one currency for another. The system doesn’t view it as a ‘trade’ that you eventually want to get out of.
For this reason, Binance does not allow you to natively attach a stop loss and a take profit to your main order.
But we can still implement one manually.
To do this, we can place an OCO order. The idea is, that if either the stop loss or take profit gets hit, the other order should be canceled.
Going back to our ETH order, here is how we can implement a stop loss and take profit.
```
try:
order = client.create_oco_order(
symbol='ETHUSDT',
side='SELL',
quantity=100,
price=250,
stopPrice=150,
stopLimitPrice=150,
stopLimitTimeInForce='GTC')
except BinanceAPIException as e:
# error handling goes here
print(e)
except BinanceOrderException as e:
# error handling goes here
print(e)
```
Note that we are passing in both a **stopPrice** and a **stopLimitPrice**. Once the **stopPrice** level gets hit, a limit order will be placed using the **stopLimitPrice**. In most cases, the prices will be the same for both of these parameters.
While most assets accept stop-loss limit order, not all of them do. Before placing your order, it’s a good idea to check if it is supported.
You can use the exchange info endpoint for this.
```
# use exchange info to confirm order types
info = client.get_symbol_info('ETHUSDT')
print(info['orderTypes'])
```
Here is the response – 
Under **orderTypes**, it shows that a stop-loss limit is indeed accepted for this asset.
There is other useful info here, such as whether the asset can be traded on margin or not, the minimum quantity, and the tick size.
### How to use Binance Coin (BNB) for discounted trading commissions?
Commissions add up quickly, but fortunately, there is a discount scheme.
The image above shows the fee schedule and discounts for trading the spot market. There are discounts for futures trading too.
You can either qualify for a discount depending on your trading volume or the quantity of Binance coin you own.
Binance coin or BNB was created by Binance in 2017. It can be used as a currency although perhaps the more common usage for it is to pay trading fees.
If you’re not keen on owning BNB, it still makes sense to own just a little bit to pay your trading fees with. After all, any amount of BNB will qualify you for the first tier.
Keep in mind, if you’re using BNB to pay for trading fees, your balance will reduce over time.
The function below ensures there is a minimum amount of BNB in your account and tops it up if there isn’t.
```
def topup_bnb(min_balance: float, topup: float):
''' Top up BNB balance if it drops below minimum specified balance '''
bnb_balance = client.get_asset_balance(asset='BNB')
bnb_balance = float(bnb_balance['free'])
if bnb_balance < min_balance:
qty = round(topup - bnb_balance, 5)
print(qty)
order = client.order_market_buy(symbol='BNBUSDT', quantity=qty)
return order
return False
```
Trading scripts are usually run in a loop, so periodically calling the above function will ensure there is enough BNB in the account to qualify for the minimum discount.
As an example, we can call the above function like this –
```
min_balance = 1.0
topup = 2.5
order = topup_bnb(min_balance, topup)
```
This would check for a balance of at least 1 BNB. If the amount of BNB has dropped below that, it will top it off to bring the account up to 2.5 BNB.
To use BNB to pay for trading fees and receive a discount, it needs to be enabled. From the main Binance page, click on the profile icon on the top right once logged in.
The first option should be your email address, click on that to get to your dashboard. From there, there will be a section that looks like this – 
This is where you can enable and disable the option to pay for trading fees with BNB.
### How to execute a trade on ETH when BTC hits a certain price?
In the next example, we will place a buy order in Ethereum when Bitcoin crosses above the $10,000 price point.
We will use the Binance WebSocket to track the price of Bitcoin.
```
import os
from time import sleep
from binance.client import Client
from binance.exceptions import BinanceAPIException, BinanceOrderException
from binance.websockets import BinanceSocketManager
from twisted.internet import reactor
# init
api_key = os.environ.get('binance_api')
api_secret = os.environ.get('binance_secret')
client = Client(api_key, api_secret)
price = {'BTCUSDT': None, 'error':False}
```
The code above looks very similar to the prior example where we showed how to use the WebSocket.
```
def btc_pairs_trade(msg):
''' define how to process incoming WebSocket messages '''
if msg['e'] != 'error':
price['BTCUSDT'] = float(msg['c'])
else:
price['error']:True
```
Next, we have our callback function. This is where all the WebSocket data will flow through. We could have programmed our trading logic here as well.
However, since we need to use a try/except block for our order entry, it’s best not to as this could interfere with error checking that takes place on the back end, in the library.
We will start the WebSocket and direct it to the `btc_pairs_trade` function we just created.
```
bsm = BinanceSocketManager(client)
conn_key = bsm.start_symbol_ticker_socket('BTCUSDT', btc_pairs_trade)
bsm.start()
```
Before getting started, a quick check to make sure we have data.
```
while not price['BTCUSDT']:
# wait for WebSocket to start streaming data
sleep(0.1)
```
The above infinite loop will break as soon as soon as the WebSocket populates our price dictionary with a new value.
On to the main trade logic.
```
while True:
# error check to make sure WebSocket is working
if price['error']:
# stop and restart socket
bsm.stop_socket(conn_key)
bsm.start()
price['error'] = False
else:
if price['BTCUSDT'] > 10000:
try:
order = client.order_market_buy(symbol='ETHUSDT', quantity=100)
break
except BinanceAPIException as e:
# error handling goes here
print(e)
except BinanceOrderException as e:
# error handling goes here
print(e)
sleep(0.1)
```
Here we are checking to see if the price is above our parameter, $10,000 in this case. If so, we send a market order to buy ETHUSDT.
After a buy order is sent, we break out of the loop and our script completes.
Don’t forget to terminate the WebSocket properly
```
bsm.stop_socket(conn_key)
reactor.stop()
```
### How to execute an ETH trade when BTC moves 5% in the last 5 minutes?
We will once again make a trading decision for Ethereum based on Bitcoin. Although in this example, we are looking for a price move larger than 5% over the past five minutes.
So if Bitcoin rallies more than 5% we buy Ethereum. If it declines by more than 5%, we will sell Ethereum.
Since we could be taking a short position here, we will be trading futures. In the spot market, you can only sell if you already own that cryptocurrency.
Our imports and most of the initial part of our script have not changed. The main difference here is that we are using Pandas as we will store incoming data from the WebSocket into a DataFrame.
```
import os
from time import sleep
from binance.client import Client
from binance.exceptions import BinanceAPIException, BinanceOrderException
from binance.websockets import BinanceSocketManager
from twisted.internet import reactor
import pandas as pd
# init
api_key = os.environ.get('binance_api')
api_secret = os.environ.get('binance_secret')
client = Client(api_key, api_secret)
price = {'BTCUSDT': pd.DataFrame(columns=['date', 'price']), 'error':False}
```
Therefore, we have imported Pandas and created a blank DataFrame in our price dictionary. The DataFrame has two columns, one for the date, or rather time. And the other column will hold the price.
The callback function contains the code to populate the DataFrame from WebSocket data.
```
def btc_pairs_trade(msg):
''' define how to process incoming WebSocket messages '''
if msg['e'] != 'error':
price['BTCUSDT'].loc[len(price['BTCUSDT'])] = [pd.Timestamp.now(), float(msg['c'])]
else:
price['error']:True
```
We are using the `.loc` function to append data into the DataFrame via the last index value. We use the length of the DataFrame to determine the index value.
At that point, we are just inserting the current time, obtained by using the Timestamp function from Pandas, and the price from the socket stream.
Now that we have our callback function created, we will start the WebSocket.
```
# init and start the WebSocket
bsm = BinanceSocketManager(client)
conn_key = bsm.start_symbol_ticker_socket('BTCUSDT', btc_pairs_trade)
bsm.start()
```
Once again, we will do a quick check to make sure data is streaming.
```
## main
while len(price['BTCUSDT']) == 0:
# wait for WebSocket to start streaming data
sleep(0.1)
sleep(300)
```
Before starting the main trade logic, we will put the script to sleep for five minutes since we need at least that much data.
```
while True:
# error check to make sure WebSocket is working
if price['error']:
# stop and restart socket
bsm.stop_socket(conn_key)
bsm.start()
price['error'] = False
else:
df = price['BTCUSDT']
start_time = df.date.iloc[-1] - pd.Timedelta(minutes=5)
df = df.loc[df.date >= start_time]
max_price = df.price.max()
min_price = df.price.min()
```
In our main loop, we first grab our DataFrame from the dictionary file and assign it to the variable **df**. This step is not necessary but makes the code easier to read for our example.
Next, we determine the time five minutes ago. We can do that by taking the last date value from our DataFrame and subtracting 5 minutes using the Timedelta function built into Pandas. We will assign this value to the variable start\_time.
With the **start\_time** value, we can filter our DataFrame down to contain only the last five minutes of data.
From there, we can use max() and min() functions from Pandas to find the highest and lowest price.
Now all we need to do is determine if there was a larger than 5% movement between the last price and either the maximum or minimum value.
```
if df.price.iloc[-1] < max_price * 0.95:
try:
order = client.futures_create_order(symbol='ETHUSDT', side='SELL', type='MARKET', quantity=100)
break
except BinanceAPIException as e:
# error handling goes here
print(e)
except BinanceOrderException as e:
# error handling goes here
print(e)
elif df.price.iloc[-1] > min_price * 1.05:
try:
order = client.futures_create_order(symbol='ETHUSDT', side='BUY', type='MARKET', quantity=100)
break
except BinanceAPIException as e:
# error handling goes here
print(e)
except BinanceOrderException as e:
# error handling goes here
print(e)
sleep(0.1)
```
If the latest price is 5% larger than the last value, we know Bitcoin is going up, and we will short Ethereum as part of our mean reversion strategy.
If the last price is 5% lower than the max price in our DataFrame, then we do the opposite.
Note that the library does not have helper functions for orders in the futures market so we are using a method similar to the create\_order function used for the spot markets.
Once again, if our order gets filled, we will break out of our main loop and properly terminate the WebSocket.
```
# properly stop and terminate WebSocket
bsm.stop_socket(conn_key)
reactor.stop()
```
This strategy, however, might be one that could be run indefinitely. If you don’t plan to break out after placing an order, it is a good idea to put the script to sleep for a period of time.
Otherwise, new orders will be sent on every tick until the 5% divergence gap closes.
### Final Thoughts
Our overall view of Binance is that it is a great exchange. It’s hard to beat their commissions, they have a good reputation, and having access to a WebSocket to stream data makes life a lot easier.
If you plan on using the Binance API, we highly recommend joining their Telegram groups. They have one [group for API announcements](https://t.me/binance_api_announcements) which will keep you up to date on any planned or unplanned outages.
They also have another group for [general API discussions](https://t.me/binance_api_english). This group is moderated and the admins are usually good at answering any API specific questions.
We recommend that you further investigate error handling. Some people are fine with logging errors to a log file. However, if your trading strategy requires precision and could get negatively impacted on a failed API call, other measures can be taken.
Check out our article on the [Interactive Brokers API](https://algotrading101.com/learn/interactive-brokers-python-api-native-guide/) where we discussed using the Telegram API as an alert system. This might be a good method to alert you if there is an error calling the API.
Lastly, if speed is a major factor in your trading script, and you plan on running it on a virtual server, consider using a server based in Asia. We were able to cut our API request times down by nearly 200ms compared to US based servers.
All the code examples used here are available for [download on GitHub](https://github.com/PythonForForex/binance-api-step-by-step-guide). Please feel free to download them to get a first-hand experience with the API. Just be careful with some of the order scripts so as not to accidentally send a market order to a live account!
Reference :
---
# Agent Instructions: Querying This Documentation
If you need additional information that is not directly available in this page, you can query the documentation dynamically by asking a question.
Perform an HTTP GET request on the current page URL with the `ask` query parameter:
```
GET https://yo-sarawut.gitbook.io/tutorials/tutorials/finance/binance-python-api.md?ask=
```
The question should be specific, self-contained, and written in natural language.
The response will contain a direct answer to the question and relevant excerpts and sources from the documentation.
Use this mechanism when the answer is not explicitly present in the current page, you need clarification or additional context, or you want to retrieve related documentation sections.