Build a Web Scraper
Beautiful Soup: Build a Web Scraper With Python

The incredible amount of data on the Internet is a rich resource for any field of research or personal interest. To effectively harvest that data, you’ll need to become skilled at web scraping. The Python libraries requests and Beautiful Soup are powerful tools for the job. If you like to learn with hands-on examples and you have a basic understanding of Python and HTML, then this tutorial is for you.
In this tutorial, you’ll learn how to:
Use
requestsand Beautiful Soup for scraping and parsing data from the WebWalk through a web scraping pipeline from start to finish
Build a script that fetches job offers from the Web and displays relevant information in your console
This is a powerful project because you’ll be able to apply the same process and the same tools to any static website out there on the World Wide Web. You can download the source code for the project and all examples in this tutorial by clicking on the link below:
Get Sample Code: Click here to get the sample code you'll use for the project and examples in this tutorial.
Let’s get started! Remove ads
What Is Web Scraping?
Web scraping is the process of gathering information from the Internet. Even copy-pasting the lyrics of your favorite song is a form of web scraping! However, the words “web scraping” usually refer to a process that involves automation. Some websites don’t like it when automatic scrapers gather their data, while others don’t mind.
If you’re scraping a page respectfully for educational purposes, then you’re unlikely to have any problems. Still, it’s a good idea to do some research on your own and make sure that you’re not violating any Terms of Service before you start a large-scale project. To learn more about the legal aspects of web scraping, check out Legal Perspectives on Scraping Data From The Modern Web.
Why Scrape the Web?
Say you’re a surfer (both online and in real life) and you’re looking for employment. However, you’re not looking for just any job. With a surfer’s mindset, you’re waiting for the perfect opportunity to roll your way!
There’s a job site that you like that offers exactly the kinds of jobs you’re looking for. Unfortunately, a new position only pops up once in a blue moon. You think about checking up on it every day, but that doesn’t sound like the most fun and productive way to spend your time.
Thankfully, the world offers other ways to apply that surfer’s mindset! Instead of looking at the job site every day, you can use Python to help automate the repetitive parts of your job search. Automated web scraping can be a solution to speed up the data collection process. You write your code once and it will get the information you want many times and from many pages.
In contrast, when you try to get the information you want manually, you might spend a lot of time clicking, scrolling, and searching. This is especially true if you need large amounts of data from websites that are regularly updated with new content. Manual web scraping can take a lot of time and repetition.
There’s so much information on the Web, and new information is constantly added. Something among all that data is likely of interest to you, and much of it is just out there for the taking. Whether you’re actually on the job hunt, gathering data to support your grassroots organization, or are finally looking to get all the lyrics from your favorite artist downloaded to your computer, automated web scraping can help you accomplish your goals.
Challenges of Web Scraping
The Web has grown organically out of many sources. It combines a ton of different technologies, styles, and personalities, and it continues to grow to this day. In other words, the Web is kind of a hot mess! This can lead to a few challenges you’ll see when you try web scraping.
One challenge is variety. Every website is different. While you’ll encounter general structures that tend to repeat themselves, each website is unique and will need its own personal treatment if you want to extract the information that’s relevant to you.
Another challenge is durability. Websites constantly change. Say you’ve built a shiny new web scraper that automatically cherry-picks precisely what you want from your resource of interest. The first time you run your script, it works flawlessly. But when you run the same script only a short while later, you run into a discouraging and lengthy stack of tracebacks!
This is a realistic scenario, as many websites are in active development. Once the site’s structure has changed, your scraper might not be able to navigate the sitemap correctly or find the relevant information. The good news is that many changes to websites are small and incremental, so you’ll likely be able to update your scraper with only minimal adjustments.
However, keep in mind that because the internet is dynamic, the scrapers you’ll build will probably require constant maintenance. You can set up continuous integration to run scraping tests periodically to ensure that your main script doesn’t break without your knowledge.
APIs: An Alternative to Web Scraping
Some website providers offer Application Programming Interfaces (APIs) that allow you to access their data in a predefined manner. With APIs, you can avoid parsing HTML and instead access the data directly using formats like JSON and XML. HTML is primarily a way to visually present content to users.
When you use an API, the process is generally more stable than gathering the data through web scraping. That’s because APIs are made to be consumed by programs, rather than by human eyes. If the design of a website changes, then it doesn’t mean that the structure of the API has changed.
However, APIs can change as well. Both the challenges of variety and durability apply to APIs just as they do to websites. Additionally, it’s much harder to inspect the structure of an API by yourself if the provided documentation is lacking in quality.
The approach and tools you need to gather information using APIs are outside the scope of this tutorial. To learn more about it, check out API Integration in Python. Remove ads
Scraping the Monster Job Site
In this tutorial, you’ll build a web scraper that fetches Software Developer job listings from the Monster job aggregator site. Your web scraper will parse the HTML to pick out the relevant pieces of information and filter that content for specific words.
You can scrape any site on the Internet that you can look at, but the difficulty of doing so depends on the site. This tutorial offers you an introduction to web scraping to help you understand the overall process. Then, you can apply this same process for every website you’ll want to scrape.
Part 1: Inspect Your Data Source
The first step is to head over to the site you want to scrape using your favorite browser. You’ll need to understand the site structure to extract the information you’re interested in.
Explore the Website
Click through the site and interact with it just like any normal user would. For example, you could search for Software Developer jobs in Australia using the site’s native search interface:
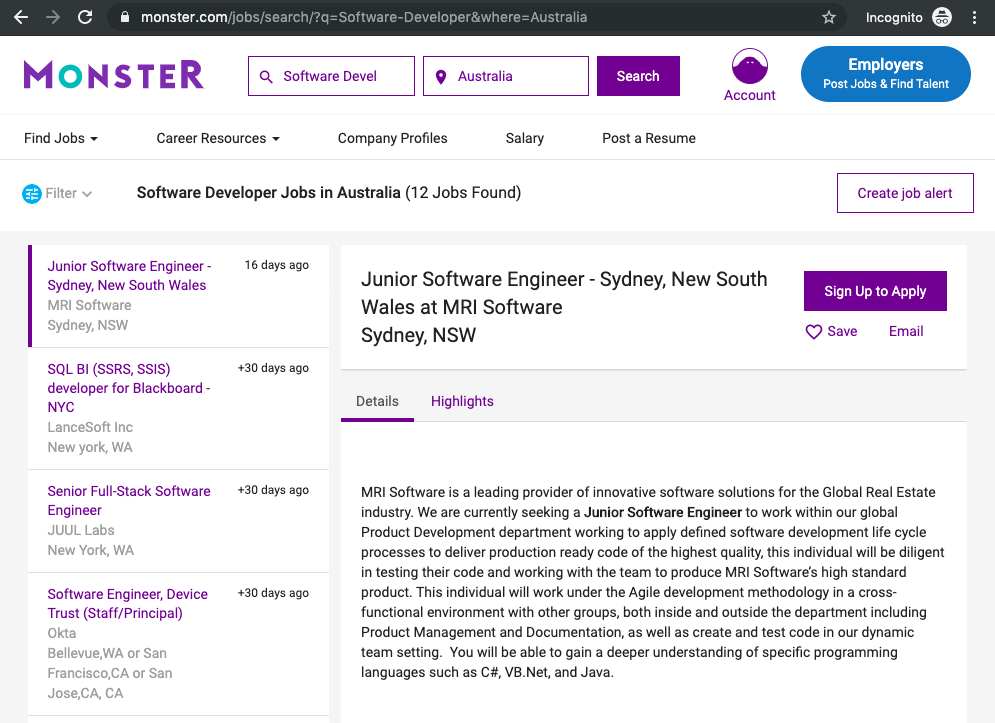
You can see that there’s a list of jobs returned on the left side, and there are more detailed descriptions about the selected job on the right side. When you click on any of the jobs on the left, the content on the right changes. You can also see that when you interact with the website, the URL in your browser’s address bar also changes.
Decipher the Information in URLs
A lot of information can be encoded in a URL. Your web scraping journey will be much easier if you first become familiar with how URLs work and what they’re made of. Try to pick apart the URL of the site you’re currently on:
You can deconstruct the above URL into two main parts:
The base URL represents the path to the search functionality of the website. In the example above, the base URL is
https://www.monster.com/jobs/search/.The query parameters represent additional values that can be declared on the page. In the example above, the query parameters are
?q=Software-Developer&where=Australia.
Any job you’ll search for on this website will use the same base URL. However, the query parameters will change depending on what you’re looking for. You can think of them as query strings that get sent to the database to retrieve specific records.
Query parameters generally consist of three things:
Start: The beginning of the query parameters is denoted by a question mark (
?).Information: The pieces of information constituting one query parameter are encoded in key-value pairs, where related keys and values are joined together by an equals sign (
key=value).Separator: Every URL can have multiple query parameters, which are separated from each other by an ampersand (
&).
Equipped with this information, you can pick apart the URL’s query parameters into two key-value pairs:
q=Software-Developerselects the type of job you’re looking for.where=Australiaselects the location you’re looking for.
Try to change the search parameters and observe how that affects your URL. Go ahead and enter new values in the search bar up top: Change these values to observe the changes in the URL.
Next, try to change the values directly in your URL. See what happens when you paste the following URL into your browser’s address bar:
You’ll notice that changes in the search box of the site are directly reflected in the URL’s query parameters and vice versa. If you change either of them, then you’ll see different results on the website. When you explore URLs, you can get information on how to retrieve data from the website’s server. Remove ads
Inspect the Site Using Developer Tools
Next, you’ll want to learn more about how the data is structured for display. You’ll need to understand the page structure to pick what you want from the HTML response that you’ll collect in one of the upcoming steps.
Developer tools can help you understand the structure of a website. All modern browsers come with developer tools installed. In this tutorial, you’ll see how to work with the developer tools in Chrome. The process will be very similar to other modern browsers.
In Chrome, you can open up the developer tools through the menu View → Developer → Developer Tools. You can also access them by right-clicking on the page and selecting the Inspect option, or by using a keyboard shortcut.
Developer tools allow you to interactively explore the site’s DOM to better understand the source that you’re working with. To dig into your page’s DOM, select the Elements tab in developer tools. You’ll see a structure with clickable HTML elements. You can expand, collapse, and even edit elements right in your browser: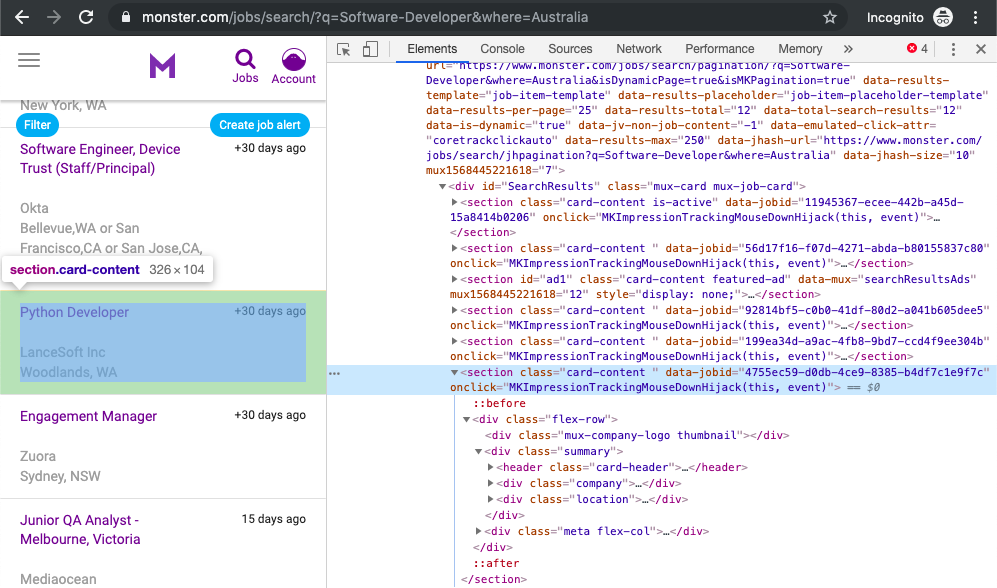 The HTML on the right represents the structure of the page you can see on the left.
You can think of the text displayed in your browser as the HTML structure of that page. If you’re interested, then you can read more about the difference between the DOM and HTML on CSS-TRICKS.
When you right-click elements on the page, you can select Inspect to zoom to their location in the DOM. You can also hover over the HTML text on your right and see the corresponding elements light up on the page.
Task: Find a single job posting. What HTML element is it wrapped in, and what other HTML elements does it contain?
Play around and explore! The more you get to know the page you’re working with, the easier it will be to scrape it. However, don’t get too overwhelmed with all that HTML text. You’ll use the power of programming to step through this maze and cherry-pick only the interesting parts with Beautiful Soup.
Part 2: Scrape HTML Content From a Page
Now that you have an idea of what you’re working with, it’s time to get started using Python. First, you’ll want to get the site’s HTML code into your Python script so that you can interact with it. For this task, you’ll use Python’s requests library. Type the following in your terminal to install it:
Then open up a new file in your favorite text editor. All you need to retrieve the HTML are a few lines of code:
This code performs an HTTP request to the given URL. It retrieves the HTML data that the server sends back and stores that data in a Python object.
If you take a look at the downloaded content, then you’ll notice that it looks very similar to the HTML you were inspecting earlier with developer tools. To improve the structure of how the HTML is displayed in your console output, you can print the object’s .content attribute with pprint().
Static Websites
The website you’re scraping in this tutorial serves static HTML content. In this scenario, the server that hosts the site sends back HTML documents that already contain all the data you’ll get to see as a user.
When you inspected the page with developer tools earlier on, you discovered that a job posting consists of the following long and messy-looking HTML:
It can be difficult to wrap your head around such a long block of HTML code. To make it easier to read, you can use an HTML formatter to automatically clean it up a little more. Good readability helps you better understand the structure of any code block. While it may or may not help to improve the formatting of the HTML, it’s always worth a try.
Note: Keep in mind that every website will look different. That’s why it’s necessary to inspect and understand the structure of the site you’re currently working with before moving forward.
The HTML above definitely has a few confusing parts in it. For example, you can scroll to the right to see the large number of attributes that the <a> element has. Luckily, the class names on the elements that you’re interested in are relatively straightforward:
class="title": the title of the job postingclass="company": the company that offers the positionclass="location": the location where you’d be working
In case you ever get lost in a large pile of HTML, remember that you can always go back to your browser and use developer tools to further explore the HTML structure interactively.
By now, you’ve successfully harnessed the power and user-friendly design of Python’s requests library. With only a few lines of code, you managed to scrape the static HTML content from the web and make it available for further processing.
However, there are a few more challenging situations you might encounter when you’re scraping websites. Before you begin using Beautiful Soup to pick the relevant information from the HTML that you just scraped, take a quick look at two of these situations. Remove ads
Hidden Websites
Some pages contain information that’s hidden behind a login. That means you’ll need an account to be able to see (and scrape) anything from the page. The process to make an HTTP request from your Python script is different than how you access a page from your browser. That means that just because you can log in to the page through your browser, that doesn’t mean you’ll be able to scrape it with your Python script.
However, there are some advanced techniques that you can use with the requests to access the content behind logins. These techniques will allow you to log in to websites while making the HTTP request from within your script.
Dynamic Websites
Static sites are easier to work with because the server sends you an HTML page that already contains all the information as a response. You can parse an HTML response with Beautiful Soup and begin to pick out the relevant data.
On the other hand, with a dynamic website the server might not send back any HTML at all. Instead, you’ll receive JavaScript code as a response. This will look completely different from what you saw when you inspected the page with your browser’s developer tools.
Note: To offload work from the server to the clients’ machines, many modern websites avoid crunching numbers on their servers whenever possible. Instead, they’ll send JavaScript code that your browser will execute locally to produce the desired HTML.
As mentioned before, what happens in the browser is not related to what happens in your script. Your browser will diligently execute the JavaScript code it receives back from a server and create the DOM and HTML for you locally. However, doing a request to a dynamic website in your Python script will not provide you with the HTML page content.
When you use requests, you’ll only receive what the server sends back. In the case of a dynamic website, you’ll end up with some JavaScript code, which you won’t be able to parse using Beautiful Soup. The only way to go from the JavaScript code to the content you’re interested in is to execute the code, just like your browser does. The requests library can’t do that for you, but there are other solutions that can.
For example, requests-html is a project created by the author of the requests library that allows you to easily render JavaScript using syntax that’s similar to the syntax in requests. It also includes capabilities for parsing the data by using Beautiful Soup under the hood.
Note: Another popular choice for scraping dynamic content is Selenium. You can think of Selenium as a slimmed-down browser that executes the JavaScript code for you before passing on the rendered HTML response to your script.
You won’t go deeper into scraping dynamically-generated content in this tutorial. For now, it’s enough for you to remember that you’ll need to look into the above-mentioned options if the page you’re interested in is generated in your browser dynamically.
Part 3: Parse HTML Code With Beautiful Soup
You’ve successfully scraped some HTML from the Internet, but when you look at it now, it just seems like a huge mess. There are tons of HTML elements here and there, thousands of attributes scattered around—and wasn’t there some JavaScript mixed in as well? It’s time to parse this lengthy code response with Beautiful Soup to make it more accessible and pick out the data that you’re interested in.
Beautiful Soup is a Python library for parsing structured data. It allows you to interact with HTML in a similar way to how you would interact with a web page using developer tools. Beautiful Soup exposes a couple of intuitive functions you can use to explore the HTML you received. To get started, use your terminal to install the Beautiful Soup library:
Then, import the library and create a Beautiful Soup object:
When you add the two highlighted lines of code, you’re creating a Beautiful Soup object that takes the HTML content you scraped earlier as its input. When you instantiate the object, you also instruct Beautiful Soup to use the appropriate parser.
Find Elements by ID
In an HTML web page, every element can have an id attribute assigned. As the name already suggests, that id attribute makes the element uniquely identifiable on the page. You can begin to parse your page by selecting a specific element by its ID.
Switch back to developer tools and identify the HTML object that contains all of the job postings. Explore by hovering over parts of the page and using right-click to Inspect.
Note: Keep in mind that it’s helpful to periodically switch back to your browser and interactively explore the page using developer tools. This helps you learn how to find the exact elements you’re looking for.
At the time of this writing, the element you’re looking for is a <div> with an id attribute that has the value "ResultsContainer". It has a couple of other attributes as well, but below is the gist of what you’re looking for:
Beautiful Soup allows you to find that specific element easily by its ID:
For easier viewing, you can .prettify() any Beautiful Soup object when you print it out. If you call this method on the results variable that you just assigned above, then you should see all the HTML contained within the <div>:
When you use the element’s ID, you’re able to pick one element out from among the rest of the HTML. This allows you to work with only this specific part of the page’s HTML. It looks like the soup just got a little thinner! However, it’s still quite dense. Remove ads
Find Elements by HTML Class Name
You’ve seen that every job posting is wrapped in a <section> element with the class card-content. Now you can work with your new Beautiful Soup object called results and select only the job postings. These are, after all, the parts of the HTML that you’re interested in! You can do this in one line of code:
Here, you call .find_all() on a Beautiful Soup object, which returns an iterable containing all the HTML for all the job listings displayed on that page.
Take a look at all of them:
That’s already pretty neat, but there’s still a lot of HTML! You’ve seen earlier that your page has descriptive class names on some elements. Let’s pick out only those:
Great! You’re getting closer and closer to the data you’re actually interested in. Still, there’s a lot going on with all those HTML tags and attributes floating around:
You’ll see how to narrow down this output in the next section.
Extract Text From HTML Elements
For now, you only want to see the title, company, and location of each job posting. And behold! Beautiful Soup has got you covered. You can add .text to a Beautiful Soup object to return only the text content of the HTML elements that the object contains:
Run the above code snippet and you’ll see the text content displayed. However, you’ll also get a lot of whitespace. Since you’re now working with Python strings, you can .strip() the superfluous whitespace. You can also apply any other familiar Python string methods to further clean up your text.
Note: The web is messy and you can’t rely on a page structure to be consistent throughout. Therefore, you’ll more often than not run into errors while parsing HTML.
When you run the above code, you might encounter an AttributeError:
If that’s the case, then take a step back and inspect your previous results. Were there any items with a value of None? You might have noticed that the structure of the page is not entirely uniform. There could be an advertisement in there that displays in a different way than the normal job postings, which may return different results. For this tutorial, you can safely disregard the problematic element and skip over it while parsing the HTML:
Feel free to explore why one of the elements is returned as None. You can use the conditional statement you wrote above to print() out and inspect the relevant element in more detail. What do you think is going on there?
After you complete the above steps try running your script again. The results finally look much better:
Find Elements by Class Name and Text Content
By now, you’ve cleaned up the list of jobs that you saw on the website. While that’s pretty neat already, you can make your script more useful. However, not all of the job listings seem to be developer jobs that you’d be interested in as a Python developer. So instead of printing out all of the jobs from the page, you’ll first filter them for some keywords.
You know that job titles in the page are kept within <h2> elements. To filter only for specific ones, you can use the string argument:
This code finds all <h2> elements where the contained string matches 'Python Developer' exactly. Note that you’re directly calling the method on your first results variable. If you go ahead and print() the output of the above code snippet to your console, then you might be disappointed because it will probably be empty:
There was definitely a job with that title in the search results, so why is it not showing up? When you use string= like you did above, your program looks for exactly that string. Any differences in capitalization or whitespace will prevent the element from matching. In the next section, you’ll find a way to make the string more general.
Pass a Function to a Beautiful Soup Method
In addition to strings, you can often pass functions as arguments to Beautiful Soup methods. You can change the previous line of code to use a function instead:
Now you’re passing an anonymous function to the string= argument. The lambda function looks at the text of each <h2> element, converts it to lowercase, and checks whether the substring 'python' is found anywhere in there. Now you’ve got a match:>>>
Your program has found a match!
Note: In case you still don’t get a match, try adapting your search string. The job offers on this page are constantly changing and there might not be a job listed that includes the substring 'python' in its title at the time that you’re working through this tutorial.
The process of finding specific elements depending on their text content is a powerful way to filter your HTML response for the information that you’re looking for. Beautiful Soup allows you to use either exact strings or functions as arguments for filtering text in Beautiful Soup objects.
Extract Attributes From HTML Elements
At this point, your Python script already scrapes the site and filters its HTML for relevant job postings. Well done! However, one thing that’s still missing is the link to apply for a job.
While you were inspecting the page, you found that the link is part of the element that has the title HTML class. The current code strips away the entire link when accessing the .text attribute of its parent element. As you’ve seen before, .text only contains the visible text content of an HTML element. Tags and attributes are not part of that. To get the actual URL, you want to extract one of those attributes instead of discarding it.
Look at the list of filtered results python_jobs that you created above. The URL is contained in the href attribute of the nested <a> tag. Start by fetching the <a> element. Then, extract the value of its href attribute using square-bracket notation:
The filtered results will only show links to job opportunities that include python in their title. You can use the same square-bracket notation to extract other HTML attributes as well. A common use case is to fetch the URL of a link, as you did above. Remove ads
Building the Job Search Tool
If you’ve written the code alongside this tutorial, then you can already run your script as-is. To wrap up your journey into web scraping, you could give the code a final makeover and create a command line interface app that looks for Software Developer jobs in any location you define.
You can check out a command line app version of the code you built in this tutorial at the link below:
Get Sample Code: Click here to get the sample code you'll use for the project and examples in this tutorial.
If you’re interested in learning how to adapt your script as a command line interface, then check out How to Build Command Line Interfaces in Python With argparse.
Additional Practice
Below is a list of other job boards. These linked pages also return their search results as static HTML responses. To keep practicing your new skills, you can revisit the web scraping process using any or all of the following sites:
Go through this tutorial again from the top using one of these other sites. You’ll see that the structure of each website is different and that you’ll need to re-build the code in a slightly different way to fetch the data you want. This is a great way to practice the concepts that you just learned. While it might make you sweat every so often, your coding skills will be stronger for it!
During your second attempt, you can also explore additional features of Beautiful Soup. Use the documentation as your guidebook and inspiration. Additional practice will help you become more proficient at web scraping using Python, requests, and Beautiful Soup.
Conclusion
Beautiful Soup is packed with useful functionality to parse HTML data. It’s a trusted and helpful companion for your web scraping adventures. Its documentation is comprehensive and relatively user-friendly to get started with. You’ll find that Beautiful Soup will cater to most of your parsing needs, from navigating to advanced searching through the results.
In this tutorial, you’ve learned how to scrape data from the Web using Python, requests, and Beautiful Soup. You built a script that fetches job postings from the Internet and went through the full web scraping process from start to finish.
You learned how to:
Inspect the HTML structure of your target site with your browser’s developer tools
Gain insight into how to decipher the data encoded in URLs
Download the page’s HTML content using Python’s
requestslibraryParse the downloaded HTML with Beautiful Soup to extract relevant information
With this general pipeline in mind and powerful libraries in your toolkit, you can go out and see what other websites you can scrape! Have fun, and remember to always be respectful and use your programming skills responsibly.
You can download the source code for the sample script that you built in this tutorial by clicking on the link below:
Get Sample Code: Click here to get the sample code you'll use for the project and examples in this tutorial.
Reference : https://realpython.com/beautiful-soup-web-scraper-python/
Last updated