Virtual Environments made easy
Jan 26, 2019
Python Virtual Environments made easy

I was starting a project where I had to quickly check if a package, Flask, worked with the Python installed on my machine. As I ran the command to install Flask, it alerted me that the package was already installed as I had Anaconda on my machine.
But when I tried to run the Hello World Flask app on Sublime Text 3, the console gave an error that it could not find the Flask module. I was confused and started reading online about the problem. I discovered that Anaconda had the Flask module but the Python I was using inside Sublime Text did not have it. I jot down to find a solution to understand how to setup Python properly, install the correct packages at the right place, and setup Sublime Text build system. My online research revealed about Virtual Environments, something that I had not read about before.
After reading many articles on Virtual Environments, I learnt a lot about Python and how I should create environments to work with Python. In this article, I’ll share my knowledge on how you can setup these environments using the Terminal.
Python
There are two versions currently being supported in the community, 2.x and 3.x versions. Some packages work well with Python 3.x but there are some which have no support for 3.x and only work with 2.x. In such a case, sometimes one would want to work with Python 2.x and sometimes with Python 3.x. We begin by installing both versions of Python, so that we can setup environments using either or both. If you have a package installer, such as Homebrew, you can use it to install Python.
Python 3.X
Python 2.X
It also installs pip, which helps us install Python packages.
Virtual Environment
Whenever you start working on a project, you’ll first decide which Python version to use and then select a number of libraries/packages that you would want. However, it’s always a good practice to not install these packages systemwide. You might be working on multiple versions of Python on the same machine or some packages that only work with certain versions of Python and break with others. In such scenarios, we can setup different environments, called Virtual Environments.
Each environment will be its own virtual space. All packages installed within that space would not interfere with packages outside the environment and will be contained only inside this space.
Identify Python Install location
Based on which method you used to install, Python would be installed in different locations.
Python installed from official website
Here, you’ll find the installed version. I have version 3.6, so the path for Python would be:
Python installed using Homebrew
This will be followed by the versions under the directory python or python@2. If we take the example of python and version 3.7.2_1, the location would be:
Install virtualenv
We’ll work with Python 3 installed using Homebrew. We install virtualenv using pip3.
Create the Virtual Environment
All packages are installed and now we can begin setting up our Virtual Environment. We need to define the location where we would like to establish our environment and also provide a name. I’ll place it in the home directory and set the name as virtEnv1.
The last argument in the above command defines the exact path of our environment along with the environment name. Our environment is now set and we can start working in it.
Activate environment
To begin working inside an environment, we need to activate the environment. When the environment is set up, a file called activate is created inside the bin folder in the environment. We set this file as the source and we are now inside the environment.
The name of the environment starts showing up inside parentheses to indicate that we are now working inside the environment.

Install packages and create a file
I’ll install Flask.
I’ve also made a file app.py inside the home directory which has the most basic Hello World code in Flask.
If I try to run the code inside the environment, it works as seen in the images below.
Client

Server
Deactivate environment
If your environment is enabled, it’s easy to move out of it. Just type deactivate in the terminal.
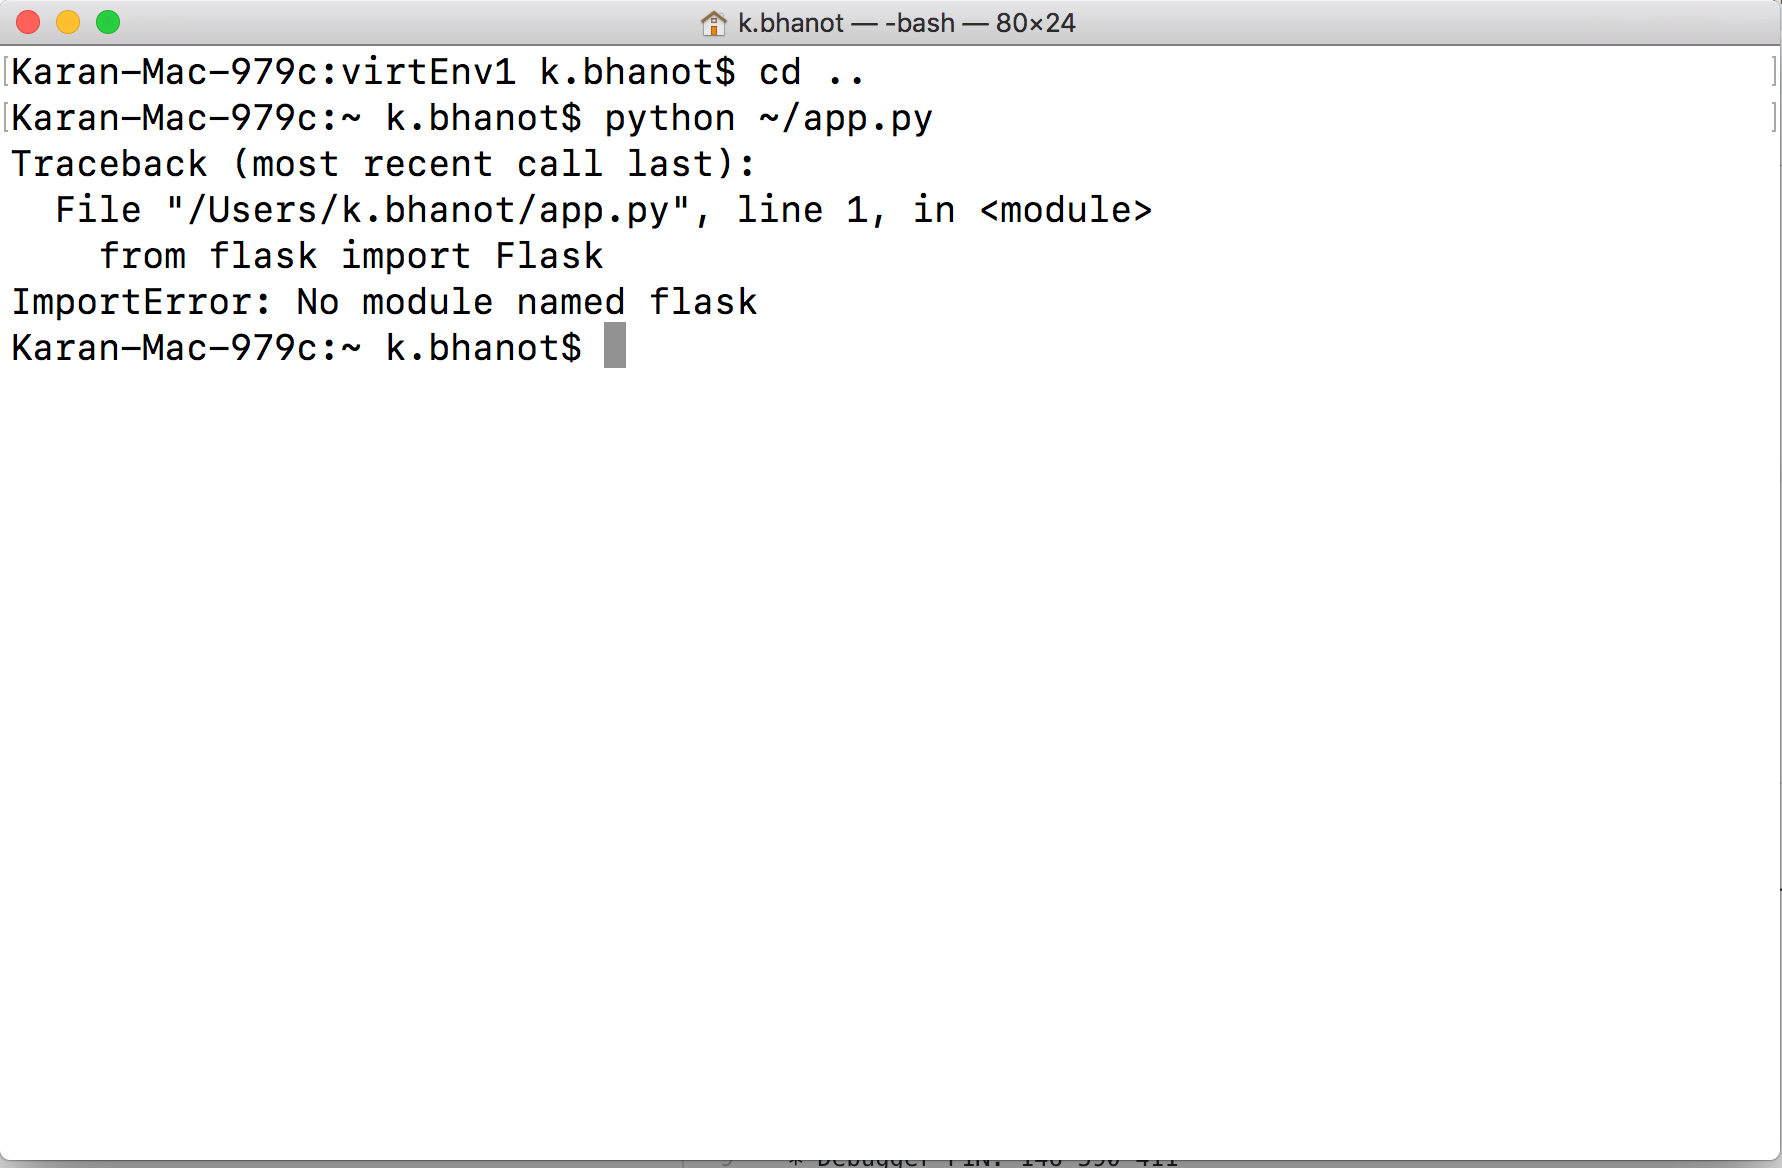
As the environment is now deactivated, we use the systemwide installed Python. There is no Flask installed across the system. Thus, if I try to run the same code again, it gives an error that flask is not found.
In a similar fashion, we can create many more environments and replicate the similar process even for Python 2.
Using Python inside Sublime Text 3
I prefer to work with Sublime Text whenever I am not working on Jupyter notebooks. To set up Sublime Text for Python, we need to create a new build system. Go to:
And set the text as below:
Replace <username> with your username.
Let’s save it as virtEnv1Python. Open the file, app.py, in Sublime Text. Set Build System as virtEnv1Python. To test if the app is working, press Command + B. You’ll see that the app starts running which you can confirm by going to the link http://127.0.0.1:5000/.
Conclusion
In this article, I discussed the use of virtualenv to create Python Virtual Environments and install packages inside these environments.
Please feel free to share your thoughts, ideas and suggestions.
Reference : https://towardsdatascience.com/python-virtual-environments-made-easy-fe0c603fe601
Last updated